Welcome to the guide - everything you need to know about solving problems with natural candles!
Making candles is a fun, creative, and relaxing experience. But sometimes, even the experts among us run into challenges—whether it's a white coating, unnecessary smoke, or an off-center wick. That's why I created this comprehensive guide for you. .
📖 What you will find in the guide ?
1. Detailed solutions to the most common problems in making soy wax candles .
2. Useful tips that will improve your results, ensure even burning, and keep your candle perfect .
3.Visual examples for each problem and solution, so you can easily identify and fix .
💡 Why is this guide a must? ?
· If you are just starting out in the world of candles, the guide will provide you with a solid foundation and answers to all your questions. .
· If you are an experienced maker, you will find methods here to upgrade and improve your techniques. .
· The guide saves time, materials and frustration and ensures a professional and enjoyable creative experience. .
Turn every problem into a learning opportunity !
To purchase the guide or join my workshops, where you will learn to create beautiful candles yourself, do not hesitate to contact me. Because you deserve to work with the best tools, and get the most out of your candles. !
~~
Table of Contents
Search for your problem and the perfect solution for it:
1) White coating (Frosting)
2) Wet spots ) (Wet Spots
3) Rough surface ( (Rough Tops
4) Cracks in the surface (Cracks)
5) Uneven surface (Rough, Pitted Tops After Burning)
6) Fragrance leak (Fragrance Leaching)
7) Smoke and soot ) (Smoke and Soot
8) Channels in the center of the candle ) (Tunneling
9) The "mushrooming" phenomenon in candles (Mushrooming)
10) Wax mixing problems (Mixing Issues)
11) Wet lumpy wax ) (Clumpy, Wet Wax
12) Air bubbles in wax (Air Bubbles)
13) Cloudy wax (Cloudy Wax)
14) Color change (Wax Discoloration)
15) Small wax pools (Small Melt Pools)
16) Holes in the candle (Sink Holes)
17) A non-centered wick (Wick Is Off-Center
~~
1 White coating- Frosting

White coating (Frosting): What is it and how do you deal with it? ?
White coating is a natural phenomenon that occurs in soy wax and is caused by the growth of tiny crystals on the surface of the wax. It is important to note that all soy wax will develop a white coating over time, but fortunately, this is only an aesthetic issue that does not affect the way the candle burns or its fragrance. . 🕯️
How to reduce and deal with white coating ?
1. Gently stirring the melted wax
Mixing the wax too vigorously can speed up the crystallization process and cause the coating to appear. Mix gently to prevent this from happening. .
2. Preheating the glassware
Gently heat the dishes in the oven at a low temperature (up to 38° ( Before pouring can help reduce the rate of coating formation) .
⚠️ Be careful not to overheat the tools and use gloves when handling hot tools. .
3. Pouring at a lower temperature
Pouring at a lower temperature can reduce the formation of crystals in the wax after it hardens. Try lowering your pour temperature gradually by 5 degrees at a time. until you find the most suitable temperature .
4. Slow cooling of the candles
Let the candles cool to room temperature (21-24° C) . (ideally) in a place without drafts. You can also place the candles on a cooling rack to ensure even cooling and prevent heat transfer from a table or hard surface. .
🎀 Bonus extra :
A white coating is not a defect, but rather evidence that you are working with natural wax. Let your customers know that this is a natural phenomenon and that there is nothing wrong with it. ! 😊
2 ) Wet spots- Wet Spots

Wet spots (Wet Spots): What is it and how to deal with it ?
What is this? ?
What look like wet spots on the sides of the candle are actually areas where the wax has separated slightly from the container as it cooled. This phenomenon is caused by different cooling rates in different areas of the container. .
Some of the wax shrinks and separates from the glass, while the rest of the wax sticks to the sides. .
This is the most common problem with candles in glass containers, but the good news is that it does not affect the performance of the candle and can be easily camouflaged with a label. . 🕯️
How to reduce wet spots ?
1. Cleaning and preheating the dishes
oh Wash the dishes with warm water and mild soap, and dry them completely. .
oh Heat the dishes in the oven at a low temperature (about 38° C). ) Before pouring .
oh The heating will help slow the cooling rate and reduce the wax pulling away from the glass. .
2. Slow pouring of the wax
oh Pour the wax slowly to avoid introducing unnecessary air bubbles. .
oh After pouring, gently tap the sides of the container to release any air bubbles that may form. .
3. Maintaining gaps between candles during cooling
oh Space the dishes about 10 cm apart to prevent heat buildup on the sides of the dishes. .
oh Place the dishes on a cooling rack instead of on a hard surface like marble, which can draw heat from the bottom and cause uneven cooling. .
Bonus tip !
Wet spots are purely aesthetic and have no effect on the candle's burn or fragrance. Let your customers know that this is a natural characteristic of working with soy wax. .
✨ A perfect candle starts with proper preparation, and that's exactly what leads to a professional result. ! ✨
3) Rough surface- Rough Tops

Rough surfaces (Rough Tops): What It Is and How to Fix It ?
The challenge
It's definitely frustrating to see a rough, unsightly surface on your candle after it has cooled. But you're not alone! This phenomenon is very common when working with soy wax. .
As the wax cools, it begins to form solid crystals. Ideally, these crystals will be uniform, giving the candle a smooth, creamy appearance. .
However, if the wax cools too quickly, too slowly, or contains small air bubbles, the surface may appear mottled or grooved. .
How to prevent and repair rough surfaces ?
1. Avoid overmixing.
Mixing too intensively can cause air bubbles to form in the melted wax, which can lead to unevenness in the surface. .
tip : If you notice air bubbles, gently tap the container immediately after pouring to release them. .
2. Adjusting the pouring temperature
Finding the perfect pouring temperature can greatly improve the result. .
Try adjusting the temperature gradually, in steps of +/- 5 degrees, until you achieve a smoother result. .
3. Covering the surface with an additional layer of wax
Keep some of the melted wax aside so you can use it to cover uneven surfaces after cooling. .
how ? Pour a thin layer (about 3 mm) of melted wax onto the top surface to hide the imperfections .
4. Smoothing the surface with a heat gun
Minor surface defects can be easily repaired with a heat gun. .
how ? Use the gun on low power, hold it close to the surface and let the wax melt slightly to smooth the damaged area. .
enlightenment:
Surface imperfections are part of the process, and sometimes the way to learn and improve is simply to experiment. .
✨ With a little patience, you can turn your candles into perfect creations. ! ✨
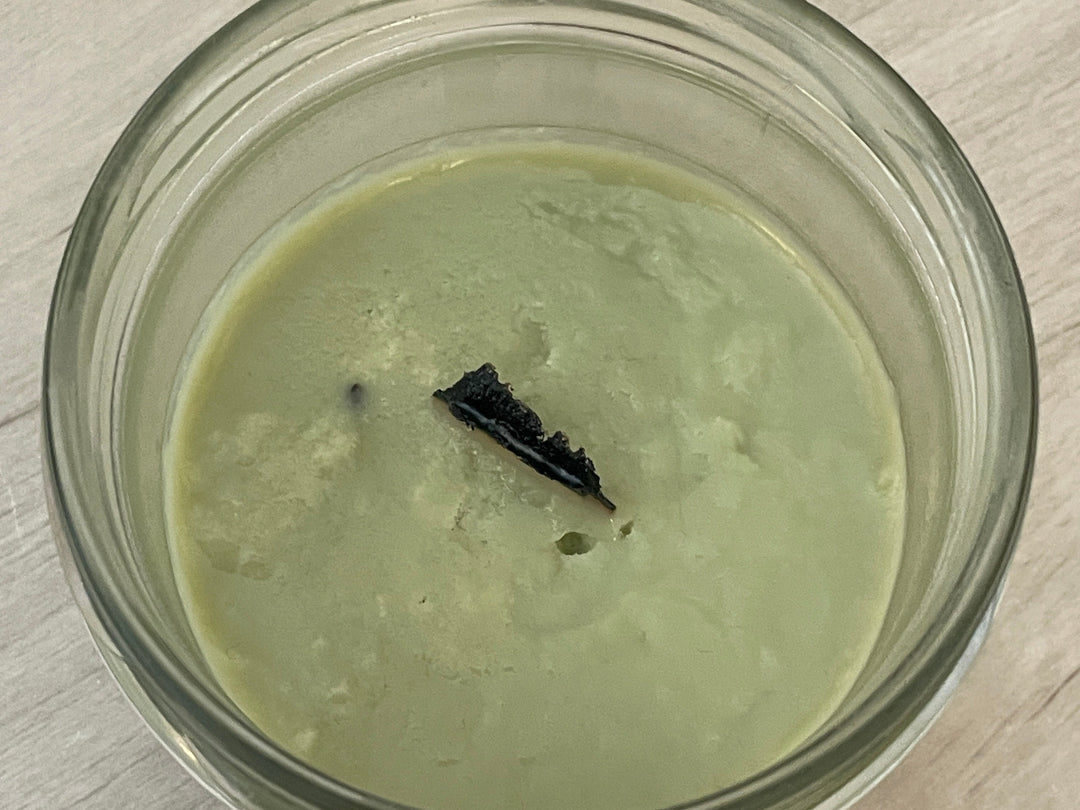
4) Cracks in the surface- Cracks

Cracks (Cracking): What Causes Them and How to Fix It ?
The challenge
Finding a thin, circular crack, about 2.5 cm from the wick, is a common occurrence. .
These cracks are caused by a combination of the wax shrinking during cooling and small air bubbles trapped at the bottom of the vessel. .
Don't worry! Most people won't notice this, and it doesn't affect the burning of the candle. .
How to prevent and repair cracks ?
1. Lightly tap the tool
oh After pouring, gently tap the container on the work surface to release any air bubbles trapped in the wax. .
⚠️ Remember to be gentle so as not to break the tool. !
2. Raising the tool during cooling
oh Place the candles on a cooling rack and not on a solid surface (such as marble).
oh A hard surface can draw heat from the bottom and cause it to cool too quickly. Air circulation under the dish helps with even cooling. .
3. Adjusting the pouring temperature
oh Try changing your pour temperature by 5 degrees (up or down) until you find the temperature that works best for your workspace. .
Correct temperature helps with uniform cooling and reduces the risk of cracks.
~~
To purchase the full guide - talk to me 054-2669571